Visual Tool For Designing Neural Networks
Fast Visual Neural Network Design with PrototypeML.com
New intuitive & powerful visual neural network design platform allowing for quick model prototyping.
![]()
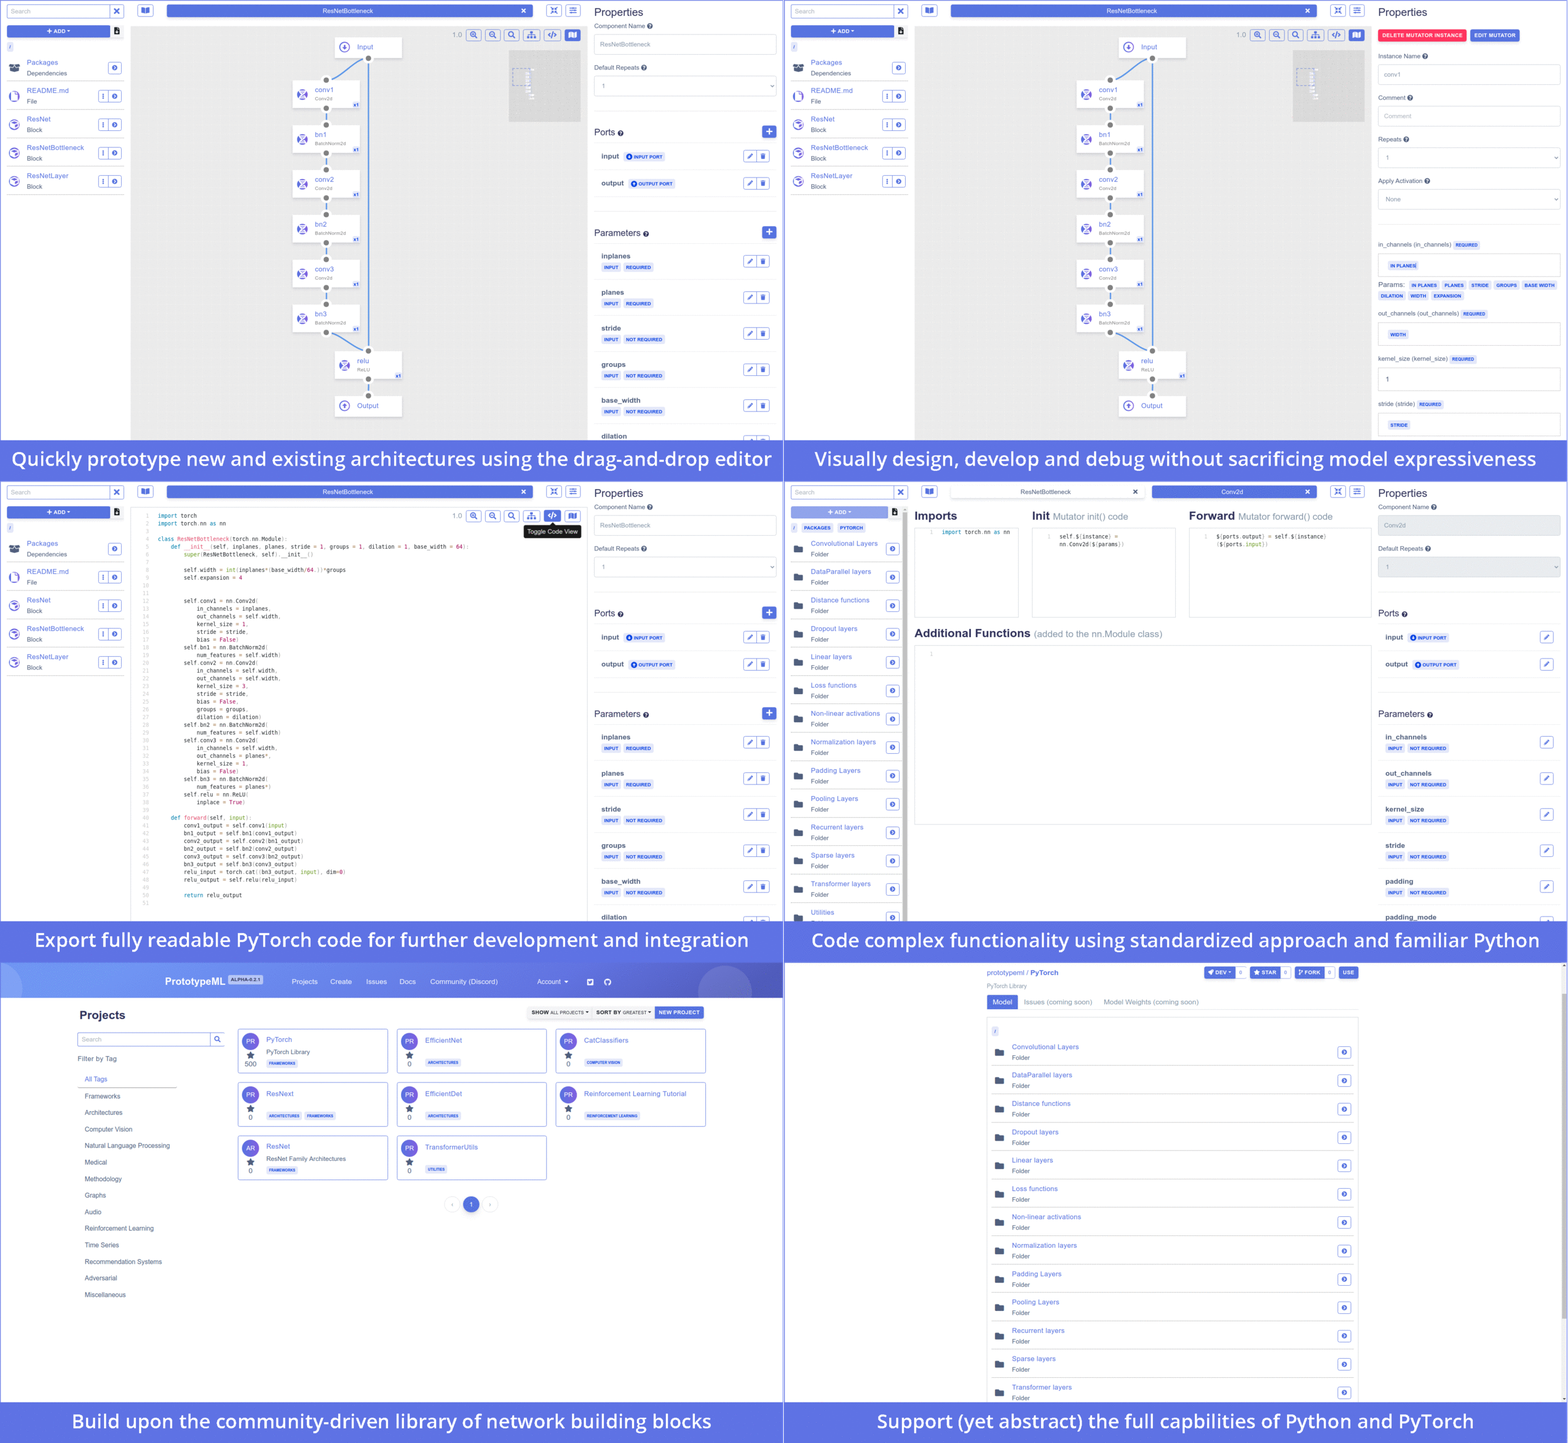
Neural network architectures are most often conceptually designed and described in visual terms, but are implemented by writing error-prone code. PrototypeML.com is a new (currently in alpha) open neural network development environment that allows you to (a) quickly prototype/design any neural network architecture through intuitive visual drag-and-drop and code editing interfaces (b) build upon a community-driven library of network building blocks, and (c) export fully readable PyTorch code for training. Try it out at PrototypeML.com.

How PrototypeML Works
PyTorch, with its increas i ng popularity with the research community, is known for its conceptual simplicity, dynamic graph support, and modular and future-proof design. PrototypeML is tightly coupled with the PyTorch framework, and supports the full range of dynamic functionality and arbitrary code execution available in normal PyTorch models. We accomplish this through several fundamental building blocks.
Representing neural networks as syntax-tree code graphs
First, we take advantage of the PyTorch "deep learning models as regular Python programs" design paradigm in order to represent neural network models in the form of static syntax-tree code graphs, rather than pre-defined neural component graphs.
Mutators
Second, we introduce the concept of a "Mutator". A mutator component encapsulates segments of normal PyTorch or arbitrary Python code, and defines a standardized format by which data inputs and outputs, and parameters can be expressed.
PyTorch models are expressed using the nn.Module class paradigm, whereby neural network layers with parameters are instantiated in the nn.Module class init() function, and called during the network's forward pass in the nn.Module class forward() function. Mutators build upon this schema by encapsulating the code necessary to execute both the instantiation of code in the init() function, and the corresponding forward() execution code into a single component that contains everything necessary to run the code regardless of where it will be used.
Mutators define the following fields:
- Required imports (such as the standard PyTorch library, or any 3rd-party PyTorch library or Python code base). If the mutator requires a package to be installed, specify that in the Python Packages section
- The data flow into, and out of the mutator during the forward() phase is defined through the Ports
- Parameters required to initialize your code in the init() are defined in the Parameters section
- The code to initialize the component within the nn.Module init() function
- The code to execute the component within the nn.Module forward() function
- Any additional functions required
Mutators implement various magic variables to allow access to settings set via the visual interface in your code, specifically:
- ${instance} | usable in init() and forward() |Used to denote the current instance name (in order to allow for multiple uses of the same mutator, variable names in the init should include this magic variable)
- ${ports.<name>} | usable in forward() only | Used to denote an input or output port variable. <name> should be replaced with your chosen name in the visual interface
- ${params} | usable in init() only | Shortcut to produce a comma separated list of input parameters to an init() function instantiation (e.g., ${params} might become spam="eggs")
- ${params.<name>} | usable in init() only | Used to denote the contents of a parameter (${params.spam} might become "eggs")

Blocks
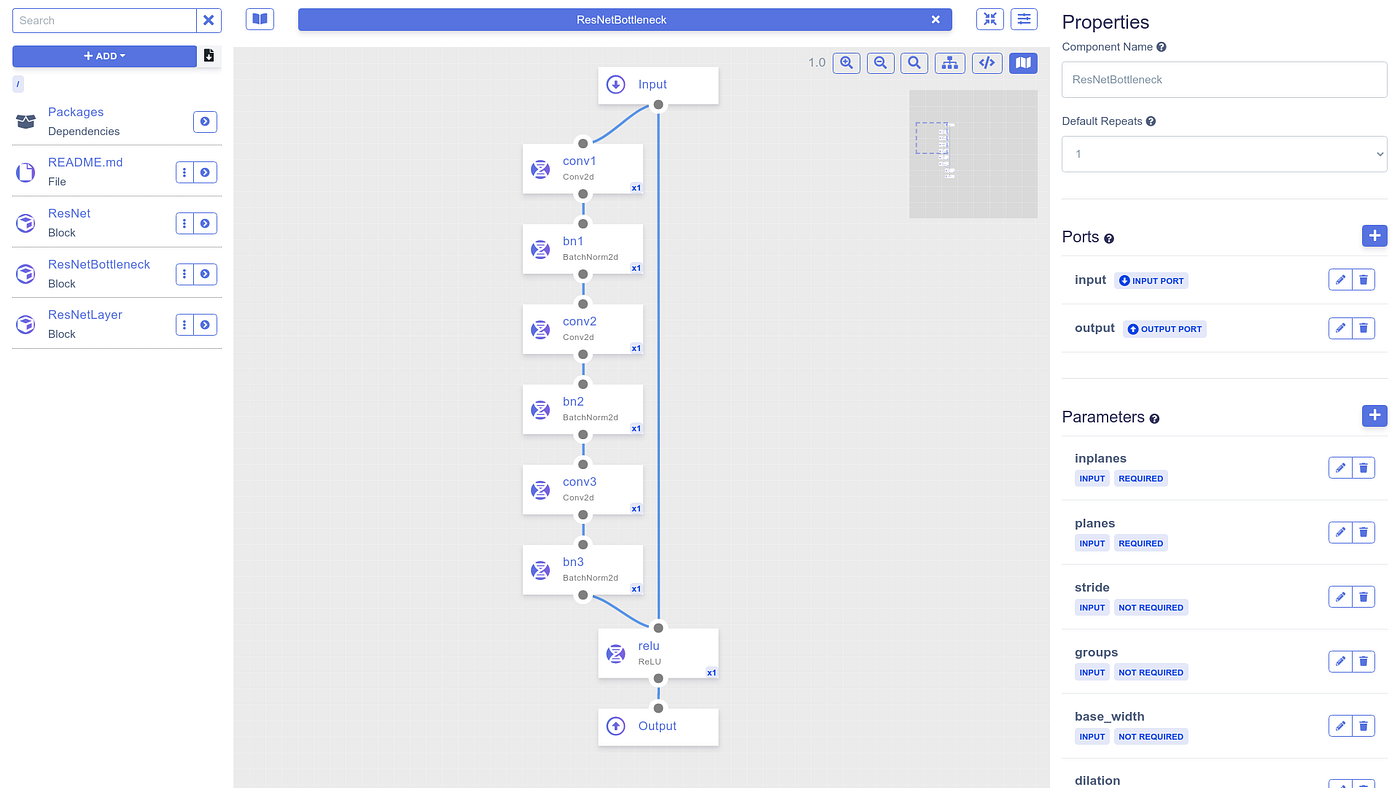
Third, we implement "Block" containers to encapsulate the relationships between child nodes. A block component represents an nn.Module class, and is represented by a visual graph. Mutators and other blocks may be added to the graph as nodes by dragging and dropping from the library bar, and the edges drawn between the various nodes represents the data flow of the neural network model.

Code generation
To generate code (accessible either via the small download button in the interface, or the View Code button in the block editor), the block graph is traversed, and mutator and block init() and forward() code sections are combined into their respective functions, and input and output dependencies and parameters between the various components are resolved. With one click, you can download the compiled code for your model, including all dependencies, conda/pip environment/requirements files etc.
Building an MNIST Classifier
With the nitty-gritty details out of the way, let's see how all this can help us prototype a neural network faster! We're going to be building a basic MNIST classifier, since that's pretty much the "Hello World" of neural networks (however don't worry, producing a similar network to handle CIFAR-10, or even ImageNet is just as easy!). The project detailed below can be found at https://prototypeml.com/prototypeml/mnist-classifier. Go ahead and fork it (after you've created an account), so you can follow along.
- Sign in/Register and fork the MNIST classifier project.
- On your project's page, click the Edit Model button on the top right side. This will bring you to the model editor interface. On your left hand side is the library bar where all your components are managed. In the middle is where you'll code your mutators, and build your blocks. On the right side is where you edit mutator, block, and component instance properties.
- First, add the already built (and automatically generated) PyTorch library from the Package Repository. In the library bar, click the "Add" button, and select "Add Package Dependency". Next, select PyTorch (it should be near the top), and click the "Use" button. This will add the package as a dependency to your project (same process for adding in any other dependency as well!). You should now see a Packages directory in your library bar. If you navigate into the Packages directory, and click PyTorch, you'll find the entire PyTorch neural network function library.
- Go back to your root directory (click the "/" in the breadcrumbs below the "Add" button), and add a Block through the "Add" button (name it whatever you'd like). Click the block to open it, and you'll be presented with the block editing interface. If you again navigate to the Packages/PyTorch directory, you can now drag any of the components available within one of the subfolders into your project.
- Go ahead and start building your model: Drag components into the block editor from the library bar and begin connecting them by dragging edges from output ports to input ports (ports are the circles at the top/bottom of a component instance). Click on a component instance to view and set the parameters specific to that component. Feel free to view the example project if you want some help figuring out what to drag in.
- At any point while in the block editor, click the "</>" button in the block editor toolbar to view the code that will be generated — explore how the code changes as you drag components and connect them together. Notice that when two edges enter a single input port, the code will automatically include a concatenation operation (configure this, or change it to an alternative combination function by clicking on the input port).
- Once you've finished editing your model, click the download code button next to the "Add" button in the library bar so you can begin training.
Using an External Library & Designing Mutators
Up until this point we've used mutators included in the PyTorch library, however if you find that you need a certain component for which a mutator hasn't been written in the Package Repository (or you'd like to include entirely custom code in your network) you'll need to design your own. We'll build a mutator wrapping a PyTorch implementation of the EfficientNet library.
- First, add a mutator by clicking the "Add" button.
- In the Properties bar on the right side of the editor, add the two parameters needed for this mutator (model name, and number of output classes) by clicking the "+" button near Parameters.
- We'll need to import the library in the Imports section, like so:
from efficientnet_pytorch import EfficientNet 4. Next, let's write the code in the Init section necessary to initialize the EfficientNet model, like so. Notice how we use the magic variables ${instance} instead of a variable name, and fill in the parameters using the ${params.<name>} syntax:
self.${instance} = EfficientNet.from_pretrained(${params.model}, num_classes=${params.num_classes}) 5. Finally, write the code necessary to call the EfficientNet model in the Forward section, like so (again, notice how we're using the magic variables ${ports.<name>} to refer to the input/output variables, and ${instance} as before):
${ports.output} = self.${instance}(${ports.input}) 6. And we're done! When dragged into a block (with the configuration set to: name='efficientnet', model='efficientnet-b0', num_classes=10), this mutator will produce the following code (assuming the rest of the block is empty):
import torch
from efficientnet_pytorch import EfficientNet class EfficientNet_Classifier(torch.nn.Module):
def __init__(self):
super(EfficientNet_Classifier, self).__init__()self.efficientnet = EfficientNet.from_pretrained('efficientnet-b0', num_classes=10)
def forward(self, input):
efficientnet_output = self.efficientnet(input)return efficientnet_output
The full MNIST example can be found at https://prototypeml.com/prototypeml/mnist-classifier.
Conclusion
PrototypeML implements a powerful and intuitive interface and component standard to allow for quick prototyping of powerful neural network architectures and experiments. We'd love to hear your thoughts and feedback on the platform, and look forward to moving from alpha to beta in the near future. You can access the platform at https://PrototypeML.com, the preprint paper here, the documentation at https://Docs.PrototypeML.com, and our Discord community channel at https://discord.gg/zq8uqSf.
Visual Tool For Designing Neural Networks
Source: https://towardsdatascience.com/fast-visual-neural-network-design-with-prototypeml-com-ed83ef4f6f64
Posted by: painterfropriat.blogspot.com

0 Response to "Visual Tool For Designing Neural Networks"
Post a Comment